
- SureCookie Installation Guide
- Installing SureCookie Pro
- Updating SureCookie
- How to Set Up SureCookie: Onboarding Wizard Guide
- SureCookie Dashboard Overview
- Connecting Your Site to SureCookie (Scanner Setup)
- Using SureCookie on Multiple Sites
- Uninstalling SureCookie & Data Cleanup
- SureCookie Shortcodes Reference
- Preferences Settings (Menu, Branding, Analytics)
- Customizing Banner Content
- Customizing Banner Layout
- Custom CSS for Banner Styling
- How to Configure the Floating Widget
- Customizing the Preference Modal
- Controlling Where the Cookie Banner Appears
- Customizing Banner Colors (Custom Colors, WCAG)
- Customizing the Blocked Content UI
- Banner Text in the Wrong Language (WPML, Polylang, and Locales)
- Re-Consent
- Understanding SureCookie Logs
- How to Set Up Geographic Targeting
- Block Scripts Until Consent (Resource Blocking)
- Setting Up Google Consent Mode v2
- Consent Models Explained (Opt-in vs Opt-out)
- Exporting Consent Logs (PDF Proof + CSV)
- Consent & Data Settings (Duration, Retention, Renew)
- Consent Forwarding Across a Multisite Network
- Resource / Script Blocking (Add Embeds + Fixes)
- Troubleshooting SureCookie
- Fix a Stuck or Failed Cookie Scan
- Why Some Cookies Aren’t Detected
- Banner Not Appearing: Troubleshooting
- Settings or Cookie Categories Not Saving or Loading
- Embeds Blocked After Consent (YouTube, Maps, Vimeo)
- Site Performance / Page Speed
- Scanning Your Site From Your Browser
- Importing and Exporting SureCookie Settings
- Verifying Your Domain With a DNS Record
How to Configure the Floating Widget
The Floating Widget is a small button pinned to a corner of your site that reopens the cookie preferences modal, so a visitor can change their consent choices long after they answered the banner. Without it, a visitor who has already consented has no obvious way back to their settings.
The Floating Widget is a SureCookie Pro feature. The button is drawn by the same consent script that draws your banner, so it appears only for visitors whose banner is enabled. See When the Widget Does Not Appear below.
How to Access Floating Widget Settings
The Floating Widget is one of three re-consent methods in SureCookie. Its settings sit under Banner, not under General.
- Go to SureCookie > Settings > Banner in your WordPress dashboard.
- Open the Re-Consent tab.
- Open the Floating Widget tab.
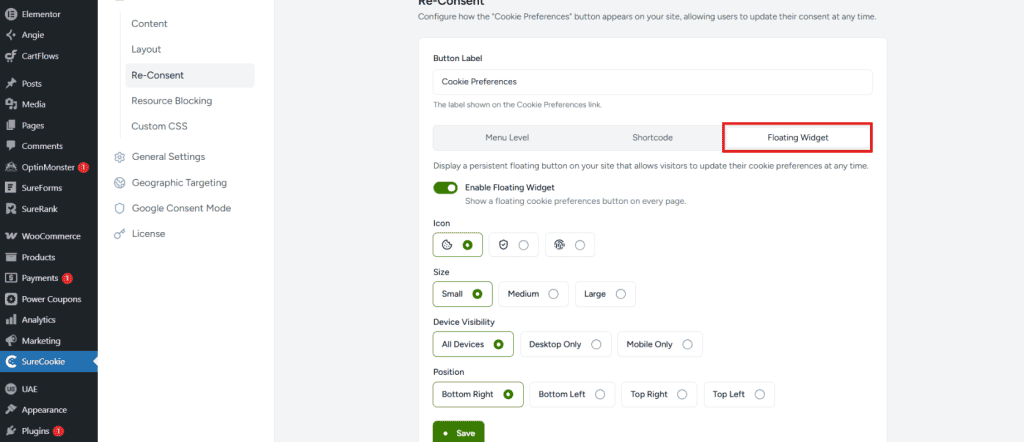
Enable Floating Widget
The first setting is the Enable Floating Widget toggle. Turning it on is what makes the button available at all. It is a global switch, not a guarantee: the button then appears on every page where your banner is active, for every visitor whose banner is enabled.
Once you enable the toggle, the configuration options below become available.
Quick Settings Reference
Before you configure, here’s what each setting controls:
| Setting | Options | Purpose |
| Icon | Cookie / Shield / Fingerprint / Logo | Determines the button’s visual appearance |
| Size | Small / Medium / Large | Controls button visibility and prominence |
| Device Visibility | All Devices / Desktop Only / Mobile Only | Limits where the widget appears |
| Position | Bottom Right / Bottom Left / Top Right / Top Left | Places the button in a corner without overlapping other elements |
Configuring Your Settings
Icon
Choose the icon that appears on the floating button. Each icon works best in different contexts:
- Cookie icon – The most recognizable option. Use this if your visitors may not immediately understand what the button does. Works well for general audiences.
- Shield/Checkmark icon – A privacy-focused symbol that conveys security and trust. Ideal if you emphasize data protection in your site’s messaging.
- Fingerprint icon – A more subtle, minimal option. Best for minimalist designs where you don’t want the button to draw heavy attention.
- Logo – Your own image in place of a preset icon. Use this when the button should carry your branding rather than a generic cookie symbol.
Selecting Logo reveals an Upload Logo field under the icon row.
- Click Upload Logo to open the WordPress media library.
- Pick an image already in your library, or upload a new one.
- Click Use this logo.
- Click Save.
The media library accepts any image format your WordPress install allows, such as PNG, JPG and WebP. SVG is not one of WordPress’s default upload types, so it works only if a plugin or a filter on your site has enabled SVG uploads.
With a logo selected, the button becomes a white rounded rectangle rather than a circle, and it can be wider than it is tall. The image is scaled to fit and capped at 60 percent of the button’s height, so a wide wordmark stays legible.
To go back to a preset icon, click the remove control on the file preview below the field. The Icon choice returns to Cookie.
Pick whichever icon best aligns with your site’s design and privacy messaging.
Size
This setting controls how large the floating button appears on the screen:
- Small – Subtle and less intrusive; takes up minimal screen space but may be harder for visitors to notice
- Medium – A balanced middle ground; visible without being prominent
- Large – Highly visible and easy to tap, especially on mobile devices; takes up more screen real estate
We recommend Medium or Large for most sites, particularly if mobile visitors make up a significant portion of your traffic. A button that’s easy to tap reduces friction for users wanting to update their preferences.
Device Visibility
Control which devices the floating widget appears on:
- All Devices – The widget shows on both desktop and mobile
- Desktop Only – The widget only appears on desktop screens
- Mobile Only – The widget only appears on mobile devices
When to use each option:
- Choose All Devices if this is your primary re-consent method
- Choose Desktop Only if you already have another re-consent method (like a menu link) on mobile
- Choose Mobile Only if you prefer a less intrusive approach on desktop but want easy access on mobile where screen space is valuable
Position
Choose where the floating button sits on the screen. There are four corner options:
- Bottom Right
- Bottom Left
- Top Right
- Top Left
Important: Make sure the position you choose does not overlap with other floating elements on your site, such as:
- Live chat widgets
- Back-to-top buttons
- Newsletter signup popups
- Contact form buttons
If your site already has a floating element in one corner, pick a different corner for the Floating Widget.
Saving Your Changes
After configuring all the settings, click the Save button at the bottom of the page to apply your changes. The floating widget will start appearing on your site right away for visitors.
Important: If you use a caching plugin (such as WP Super Cache, W3 Total Cache, or similar), clear your cache within that plugin’s settings after saving changes. Without clearing the cache, visitors may not see the updated widget immediately.
When the Widget Does Not Appear
The Floating Widget is not an independent button. The same script that draws your banner draws the widget, so anything that switches the banner off for a visitor switches the widget off for that visitor too. The button is hidden in each of these cases.
- The banner is still on screen – The widget appears only once the visitor has answered the banner. Until then the banner itself is the way in.
- The banner is off site-wide – With Enable Cookie Banner off under SureCookie > Settings > Banner > Content, the floating widget does not render. A re-consent menu item or the shortcode still works and still opens the preferences window, so visitors keep a way to change their choices.
- A geographic rule hides the banner for that visitor’s country – Under SureCookie > Tracking Manager > Geographic Rules, a rule with Show Consent Banner off leaves visitors in that region with no banner and no widget. Visitors in a country that no rule covers get the same result when Where should the banner appear? is set to Show only where required by law. Geographic Rules are a SureCookie Pro feature.
- The rule’s own widget switch is off – A rule can keep its banner and still drop the widget. Check Show Floating Widget on that rule’s Configuration tab.
- A visibility rule hides the banner on that page – Any page, URL, template, archive or user role listed under Do Not Display Banner On at SureCookie > Settings > Banner > Visibility loses the widget as well. The Menu Level link and the
Cookie Preferencesshortcode are hidden on those pages for the same reason. Visibility is a SureCookie Pro feature. - Device Visibility excludes that screen – Desktop Only hides the button at 782 pixels of browser width and below; Mobile Only hides it above that. The rule follows the browser window, not the device, so narrowing a desktop window hides a Desktop Only button.
- SureCookie is older than SureCookie Pro requires – The widget does not render below the supported floor. WordPress shows an admin notice asking you to update SureCookie when this is the case.
Note: A geographic rule can only narrow what your global settings allow. Show Floating Widget on a rule cannot bring back a widget that Enable Floating Widget has switched off.
Understanding Re-Consent Methods
The Floating Widget is one of three ways visitors can update their cookie preferences:
- Floating Widget – Pinned to a corner on every page where your banner is active; best for persistent, one-click access.
- Menu Level – Adds a link to your site’s navigation menu; less intrusive but requires visitors to know where to look
- Shortcode – Place a re-consent button anywhere on a specific page using a shortcode; most flexible for custom layouts
You can use multiple re-consent methods on the same site. For example, you might use a Menu Level link on desktop and a Floating Widget on mobile.
Important Notes
- The Floating Widget is a Pro feature. You will need SureCookie Pro to use it.
- The widget appears only after the visitor has answered the banner, by accepting, declining or saving their preferences. Closing the tab does not count. It is a way back into preferences, not a replacement for the banner.
- If you use a caching plugin, clear your cache after enabling or changing the widget settings for changes to take effect immediately.
- Test the widget on both desktop and mobile to ensure it displays correctly and doesn’t conflict with other elements.
Configured well, the Floating Widget gives every visitor who sees your banner a clear way back to their cookie preferences. If the button is missing for some visitors, work through When the Widget Does Not Appear above before changing anything else.
For a map of every banner and widget option, the screen each one lives on, and which copy wins when a geographic rule disagrees with your global settings, see Where Banner and Widget Settings Live, and Which One Wins.
We don't respond to the article feedback, we use it to improve our support content.