
- SureCookie Installation Guide
- Installing SureCookie Pro
- Updating SureCookie
- How to Set Up SureCookie: Onboarding Wizard Guide
- SureCookie Dashboard Overview
- Connecting Your Site to SureCookie (Scanner Setup)
- Using SureCookie on Multiple Sites
- Uninstalling SureCookie & Data Cleanup
- SureCookie Shortcodes Reference
- Preferences Settings (Menu, Branding, Analytics)
- Customizing Banner Content
- Customizing Banner Layout
- Custom CSS for Banner Styling
- How to Configure the Floating Widget
- Customizing the Preference Modal
- Controlling Where the Cookie Banner Appears
- Customizing Banner Colors (Custom Colors, WCAG)
- Customizing the Blocked Content UI
- Banner Text in the Wrong Language (WPML, Polylang, and Locales)
- Re-Consent
- Understanding SureCookie Logs
- How to Set Up Geographic Targeting
- Block Scripts Until Consent (Resource Blocking)
- Setting Up Google Consent Mode v2
- Consent Models Explained (Opt-in vs Opt-out)
- Exporting Consent Logs (PDF Proof + CSV)
- Consent & Data Settings (Duration, Retention, Renew)
- Consent Forwarding Across a Multisite Network
- Resource / Script Blocking (Add Embeds + Fixes)
- Troubleshooting SureCookie
- Fix a Stuck or Failed Cookie Scan
- Why Some Cookies Aren’t Detected
- Banner Not Appearing: Troubleshooting
- Settings or Cookie Categories Not Saving or Loading
- Embeds Blocked After Consent (YouTube, Maps, Vimeo)
- Site Performance / Page Speed
- Scanning Your Site From Your Browser
- Importing and Exporting SureCookie Settings
- Verifying Your Domain With a DNS Record
- Why reCAPTCHA Is Blocked, and How to Release It
- Is SureCookie a Google-Certified CMP?
- Where Banner and Widget Settings Live, and Which One Wins
- Why Trackers Still Fire Before Consent
- Is SureCookie GDPR Compliant? (Overview)
- Whitelisting the SureCookie Scanner
- Excluding the SureCookie Banner from LiteSpeed Cache
Verifying Your Domain With a DNS Record
Before SureCookie can scan your site, it has to confirm that you control the domain. Normally this happens invisibly: our scanner sends a request to your site, reads back a one-time token, and verification completes in a second or two.
On some sites that request never arrives. A firewall, a security plugin, or your host’s bot protection blocks it before WordPress sees it. Verification fails, and because your site is never registered, scanning cannot start at all.
DNS verification is the way through. Instead of us reaching your site, you publish a small TXT record that proves ownership from the outside. Nothing has to reach your server, so a firewall cannot block it.
DNS verification is available in SureCookie 1.4.0 and later.
When You Need This
You need DNS verification only when the normal check has already failed. SureCookie tells you when that happens: starting a scan shows We Could Not Verify Your Domain, followed by the DNS record to add.
The most common causes are:
- A security plugin firewall – Wordfence, Sucuri, MalCare and similar tools reject unfamiliar visitors, including our scanner.
- Host-level bot protection – some managed hosts filter automated requests before WordPress loads.
- Cloudflare Bot Fight Mode – this one has no allowlist, so DNS is the only route.
- An unreachable REST API – pretty permalinks disabled, or a plugin that turns off
/wp-json/.
If you can allowlist our scanner with your host, that works too. DNS verification is the better option when you do not control the firewall, or when getting a rule added means a support ticket to someone else.
Step 1: Start a Scan to Get Your Record
The record is generated for your site the first time verification fails, so begin there.
- Go to SureCookie → Tracking Manager → Scanning → Manual.
- Select the content you want to scan.
- Click Start Scan.
If verification fails, the DNS panel appears in place of the scan results. It also appears during onboarding if the first scan fails there.
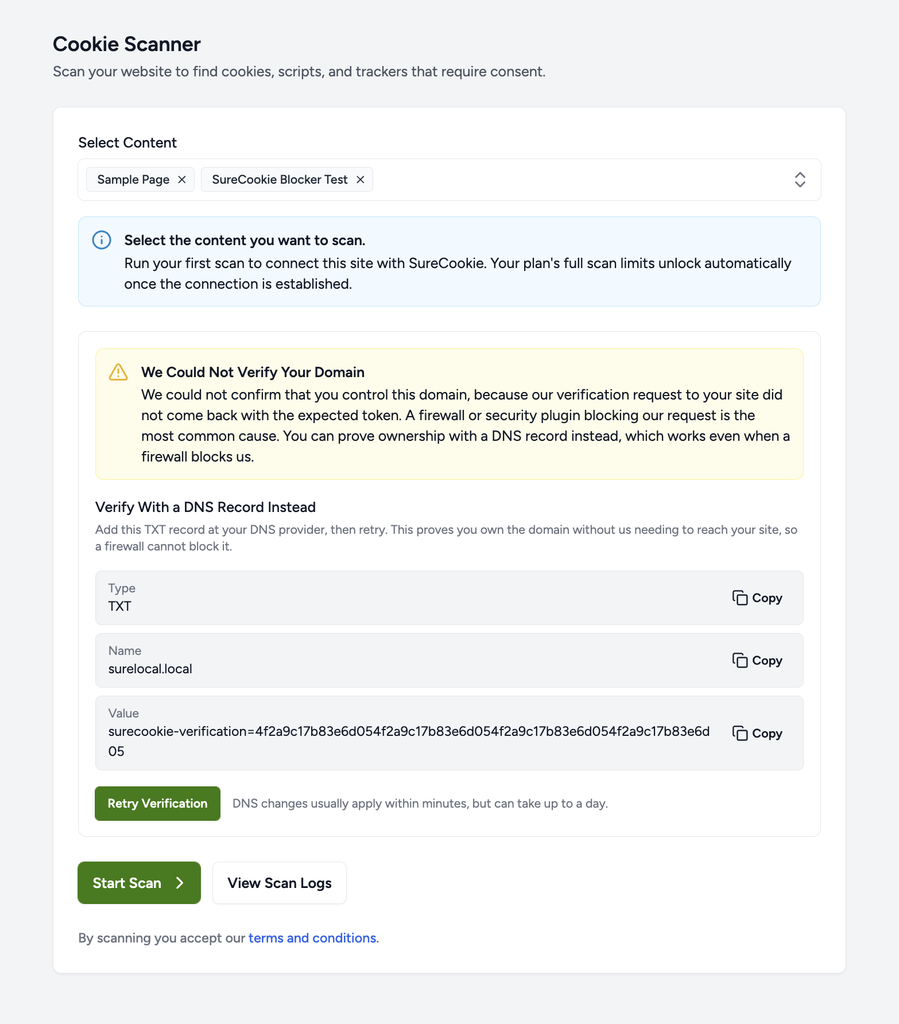
The panel shows three values:
- Type – always
TXT. - Name – your domain, for example
example.com. - Value – a unique token that looks like
surecookie-verification=followed by a long string.
Use the Copy button beside each field rather than retyping. The token is long, and a single wrong character means verification will not pass.
Important: leave this screen open, or at least do not start another scan while you add the record. Each attempt generates a fresh token, and starting again replaces the one you published.
Step 2: Add the TXT Record at Your DNS Provider
Add the record wherever your domain’s DNS is managed. That is usually your registrar (GoDaddy, Namecheap, Google Domains), or Cloudflare if your site sits behind it.
- Sign in to your DNS provider and open the DNS records for your domain.
- Add a new record and set its type to TXT.
- Enter the Name exactly as described below.
- Paste the Value from SureCookie.
- Leave TTL at its default, or set it to the lowest value offered.
- Save the record.
Most providers do not want the full domain in the Name field. They add it for you.
| SureCookie shows | Enter in the Name field |
|---|---|
example.com | @ |
shop.example.com | shop |
Tip: if your provider shows a preview of the finished record, check that it does not read example.com.example.com. That means the domain was entered twice.
Step 3: Retry Verification
Once the record is saved, return to SureCookie.
- Go back to SureCookie → Tracking Manager → Scanning → Manual.
- Click Retry Verification.
If the record has propagated, you will see Domain verified, and your site is registered and ready to scan. You can then start your scan as normal.
If it has not propagated yet, you will see Still not verified. This is expected soon after adding a record. Wait a few minutes and click Retry Verification again.
DNS changes usually apply within minutes, but can take up to a day depending on your provider.
Note: Retry Verification only rechecks the record. It does not start a new scan and does not generate a new token, so it is safe to click as many times as you need.
Once your site is verified you can remove the TXT record if you prefer. It is checked only during verification.
Troubleshooting
- Still not verified after an hour – confirm the record is live using a public DNS lookup tool. Search for the TXT records on your domain and check the value matches what SureCookie shows.
- The value does not match – some providers wrap TXT values in quotation marks automatically. That is fine. What matters is that the text inside matches exactly, with no added spaces or line breaks.
- You started another scan while waiting – the token has changed. Copy the new Value from the panel and update the TXT record to match.
- The record is on the wrong host – if you entered the full domain in the Name field, you may have created a record for
example.com.example.com. Delete it and enter@instead. - Cloudflare users – add the record under DNS → Records. TXT records are never proxied, so the orange cloud does not apply.
- The panel does not appear at all – verification may have failed for a different reason. Read the message shown on screen: it reports what our service actually returned, such as a registration that was never started. In that case start the scan again rather than adding a record.
Next Steps
With your domain verified, your site is registered and every scan runs normally from then on. You will not need to verify again.
We don't respond to the article feedback, we use it to improve our support content.