
- SureCookie Installation Guide
- Installing SureCookie Pro
- Updating SureCookie
- How to Set Up SureCookie: Onboarding Wizard Guide
- SureCookie Dashboard Overview
- Connecting Your Site to SureCookie (Scanner Setup)
- Using SureCookie on Multiple Sites
- Uninstalling SureCookie & Data Cleanup
- SureCookie Shortcodes Reference
- Preferences Settings (Menu, Branding, Analytics)
- Customizing Banner Content
- Customizing Banner Layout
- Custom CSS for Banner Styling
- How to Configure the Floating Widget
- Customizing the Preference Modal
- Controlling Where the Cookie Banner Appears
- Customizing Banner Colors (Custom Colors, WCAG)
- Customizing the Blocked Content UI
- Banner Text in the Wrong Language (WPML, Polylang, and Locales)
- Re-Consent
- Understanding SureCookie Logs
- How to Set Up Geographic Targeting
- Block Scripts Until Consent (Resource Blocking)
- Setting Up Google Consent Mode v2
- Consent Models Explained (Opt-in vs Opt-out)
- Exporting Consent Logs (PDF Proof + CSV)
- Consent & Data Settings (Duration, Retention, Renew)
- Consent Forwarding Across a Multisite Network
- Resource / Script Blocking (Add Embeds + Fixes)
- CCPA / CPRA Compliance with SureCookie
- Handling Data Requests
- Setting Up Your Business Details
- Generating a Privacy Policy Page
- Recording Consent Without Storing Visitor IP Addresses
- Generating a Cookie Policy Page
- Troubleshooting SureCookie
- Fix a Stuck or Failed Cookie Scan
- Why Some Cookies Aren’t Detected
- Banner Not Appearing: Troubleshooting
- Settings or Cookie Categories Not Saving or Loading
- Embeds Blocked After Consent (YouTube, Maps, Vimeo)
- Site Performance / Page Speed
- Scanning Your Site From Your Browser
- Importing and Exporting SureCookie Settings
- Verifying Your Domain With a DNS Record
How to Set Up Geographic Targeting
Geographic Targeting in SureCookie Pro allows you to display your cookie banner only to visitors from regions where privacy regulations such as GDPR, CCPA/CPRA, or LGPD apply. This helps ensure compliance while avoiding unnecessary prompts for users in other locations.
Step 1: Select Display Location
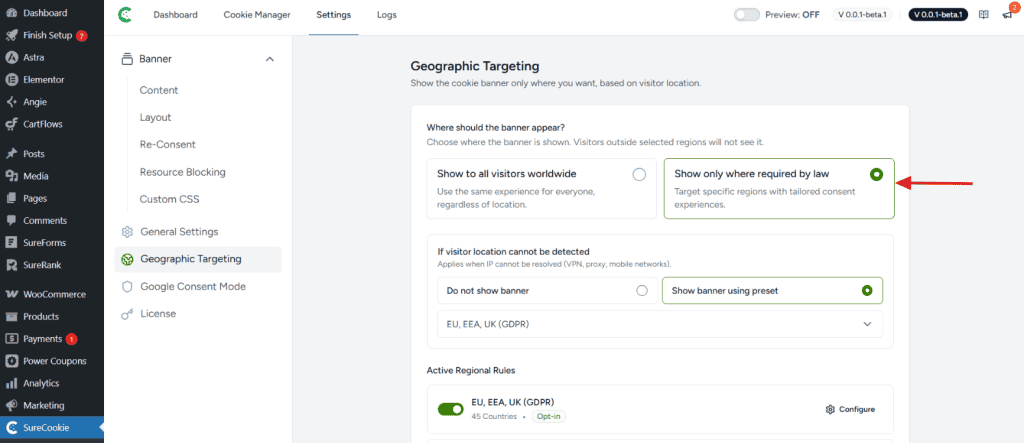
- Go to SureCookie > Settings > Geographic Targeting from your WordPress dashboard.
- Under Where should the banner appear?, select Show only where required by law.
- This reveals additional settings for regional targeting.
Step 2: Configure Fallback Behavior
When you enable location-based cookie rules in SureCookie, the plugin detects visitor location using their IP address. If the location cannot be determined, fallback settings control what happens.
When Fallback Rules Apply
Fallback rules activate when SureCookie cannot detect a visitor’s location. This occurs with:
- VPN connections
- Proxy servers
- Certain mobile networks
Fallback Options
Do not show banners : The consent banner does not appear for visitors with undetectable locations.
Show banner using preset : The consent banner displays using rules from a selected preset region. You choose which region’s compliance rules to apply as the fallback standard.
Available Preset Regions
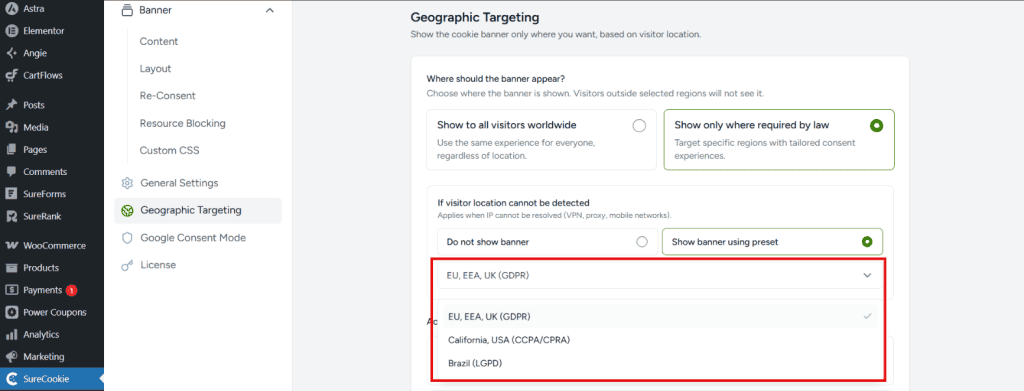
When you select “Show banner using preset,” open the dropdown to choose your fallback preset.
All the presets that you have set up will be shown in the dropdown menu you can select any of them depending on your requirement.
Recommended Configuration
Select “Show banner using preset” with the EU, EEA, UK (GDPR) preset. This ensures compliance by default for visitors with undetectable locations, applying the strictest consent rules even when their exact location is unknown.
Step 3: Review Regional Presets
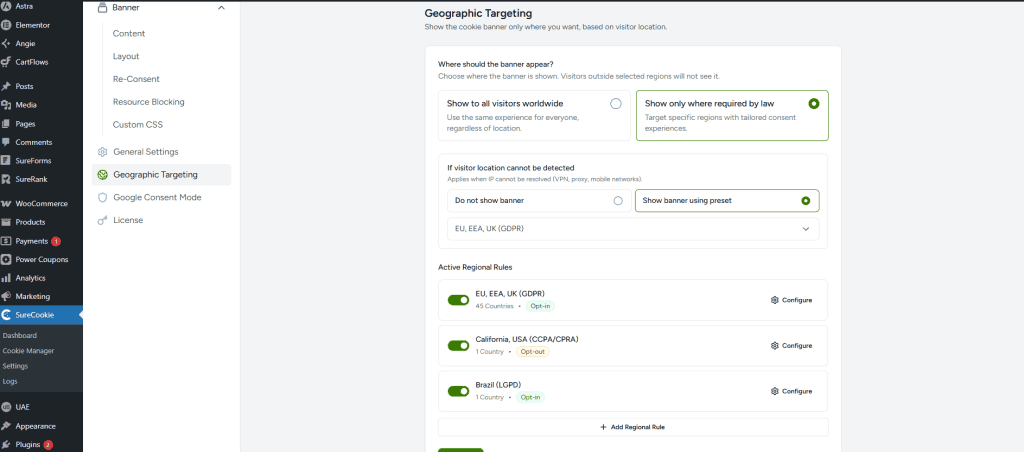
SureCookie Pro includes three built-in regional presets covering common privacy regulations.
| Region | Coverage | Model | Default |
| EU, EEA, UK (GDPR) | 45 Countries | Opt-in | Enabled |
| California, USA (CCPA/CPRA) | 1 Country | Opt-out | Disabled |
| Brazil (LGPD) | 1 Country | Opt-in | Disabled |
Understanding Consent Models
- Opt-in: Cookies are blocked until the visitor actively gives consent. Required under GDPR and LGPD.
- Opt-out: Cookies are allowed by default, and the visitor can choose to opt out. Used under CCPA/CPRA.
Step 4: Enable or Disable Rules
- Each regional rule has a toggle switch. Use these to enable or disable rules based on your needs.
- After making changes, click Save at the bottom of the page.
Step 5: Configure Individual Rules
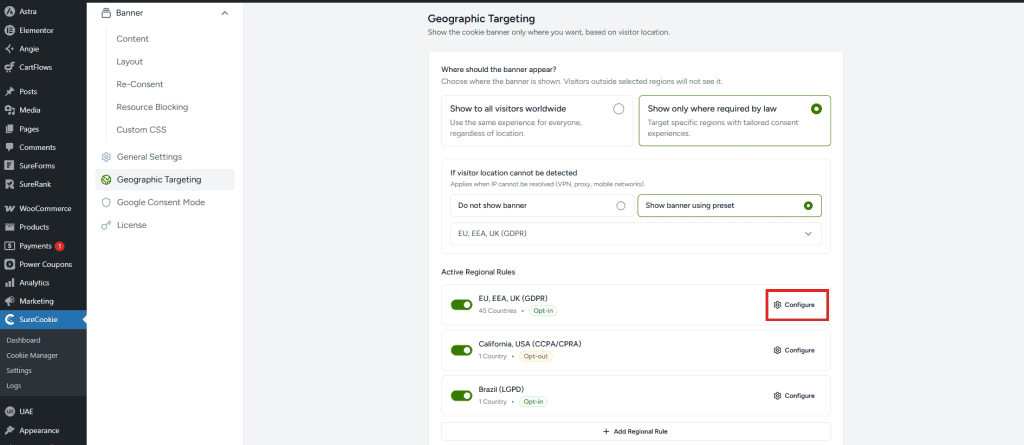
Click the Configure button on any rule to customize the consent experience for that region, including banner text and button labels.
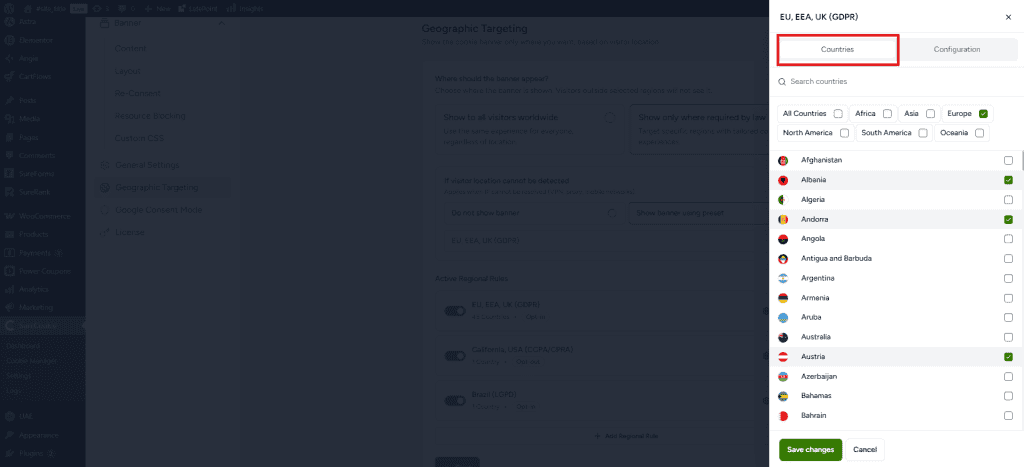
Countries Tab
- Enter a name for your rule (for example, APAC Region or Middle East).
- Use regional filter tabs to narrow your selection: All Countries, Africa, Asia, Europe, North America, South America, or Oceania.
- Search for specific countries using the Search countries field.
- Check the checkbox next to each country to include in this rule.
Configuration Tab
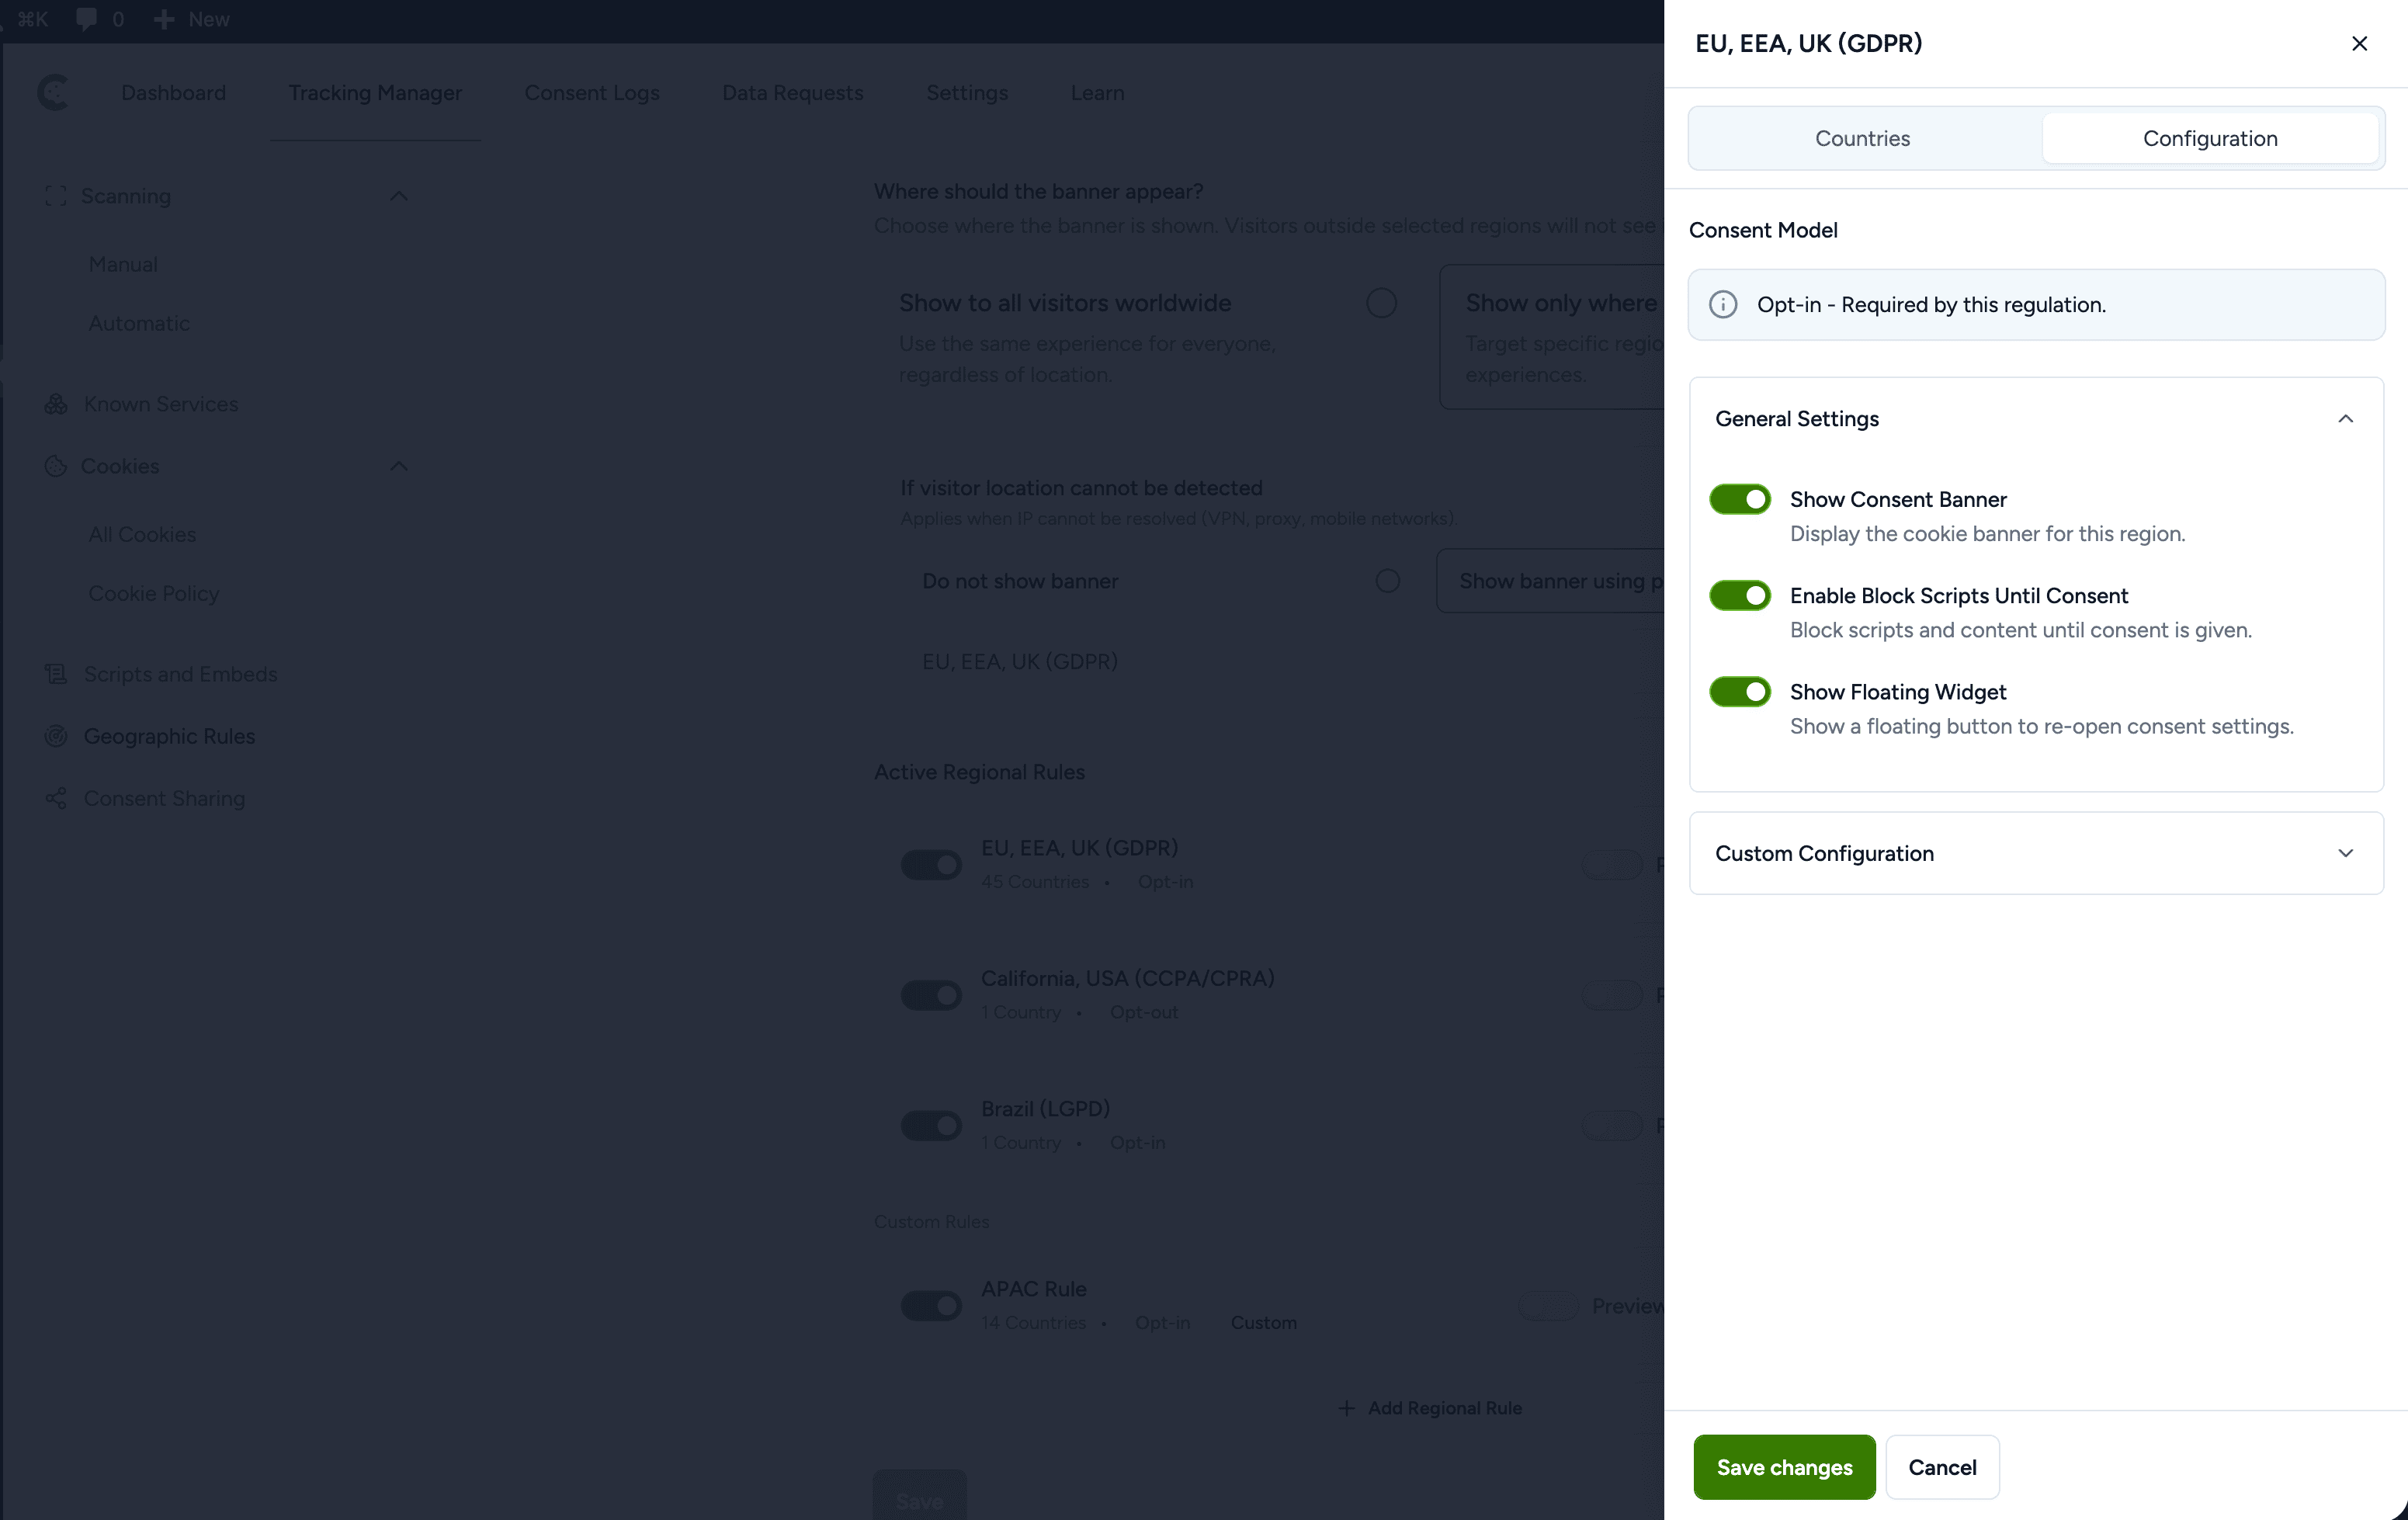
Choose your consent model (Opt-in or Opt-out) based on applicable privacy laws.
General Settings:
- Show Consent Banner: Display the cookie banner for visitors in this region.
- Enable Block Scripts Until Consent: Block scripts from loading until the visitor gives consent.
- Show Floating Widget: Display a button allowing visitors to re-open consent settings.
Custom Configuration:
The Custom Configuration section allows you to personalize the cookie consent banner to reflect your site’s branding and voice.
Use Custom Message Replace the default banner text with a message tailored to your audience.
Banner Description Add custom text explaining your cookie usage. This message displays in the consent banner.
Button Order Arrange consent buttons (Decline, Preferences, Only Essential, Accept All) by dragging and dropping them into your preferred sequence.
Button Text Customize the label for each button to match your brand:
- Only Essential Button Text
- Accept All Button Text
- Decline Button Text
- Preferences Button Text
Personalize every element to ensure your consent banner reflects your brand identity and improves user experience.
Step 6: Add Custom Rules
For regions not covered by built-in presets, click the + Add Regional Rule button.
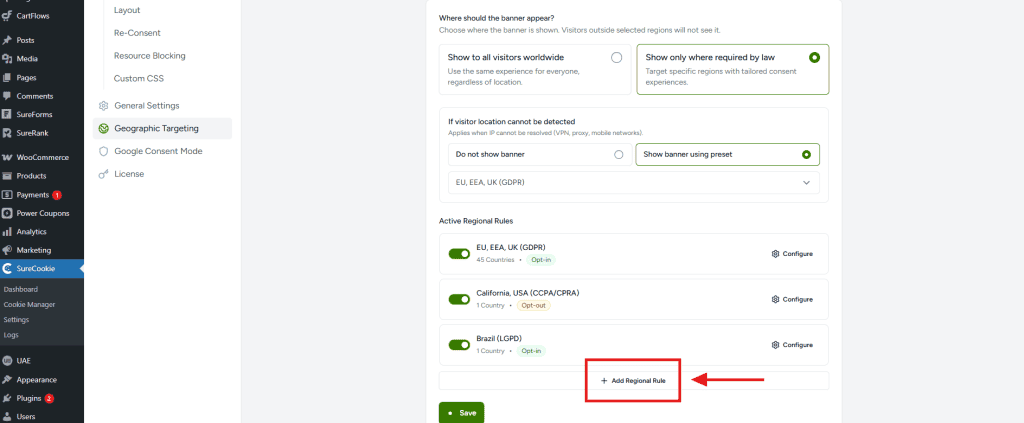
- Enter a descriptive name for your rule.
- Click Countries and select your countries using regional filters or search.
- Click Configuration and choose your consent model.
- Click Save rule to create your custom regional rule.
After Setup
- Click Save after enabling, disabling, or configuring rules.
- Clear your cache if using a caching plugin to ensure visitors see the correct banner.
- Test from different locations (or use a VPN) to confirm the correct display.
SureCookie uses GeoLite2 data by MaxMind for IP-based geolocation. Some VPNs and mobile networks may not resolve correctly. When using fallback presets, GDPR (Opt-in) is typically the safest default.
We don't respond to the article feedback, we use it to improve our support content.