
- SureCookie Installation Guide
- Installing SureCookie Pro
- Updating SureCookie
- How to Set Up SureCookie: Onboarding Wizard Guide
- SureCookie Dashboard Overview
- Connecting Your Site to SureCookie (Scanner Setup)
- Using SureCookie on Multiple Sites
- Uninstalling SureCookie & Data Cleanup
- SureCookie Shortcodes Reference
- Preferences Settings (Menu, Branding, Analytics)
- Customizing Banner Content
- Customizing Banner Layout
- Custom CSS for Banner Styling
- How to Configure the Floating Widget
- Customizing the Preference Modal
- Controlling Where the Cookie Banner Appears
- Customizing Banner Colors (Custom Colors, WCAG)
- Customizing the Blocked Content UI
- Banner Text in the Wrong Language (WPML, Polylang, and Locales)
- Re-Consent
- Understanding SureCookie Logs
- How to Set Up Geographic Targeting
- Block Scripts Until Consent (Resource Blocking)
- Setting Up Google Consent Mode v2
- Consent Models Explained (Opt-in vs Opt-out)
- Exporting Consent Logs (PDF Proof + CSV)
- Consent & Data Settings (Duration, Retention, Renew)
- Consent Forwarding Across a Multisite Network
- Resource / Script Blocking (Add Embeds + Fixes)
- CCPA / CPRA Compliance with SureCookie
- Handling Data Requests
- Setting Up Your Business Details
- Generating a Privacy Policy Page
- Recording Consent Without Storing Visitor IP Addresses
- Generating a Cookie Policy Page
- Troubleshooting SureCookie
- Fix a Stuck or Failed Cookie Scan
- Why Some Cookies Aren’t Detected
- Banner Not Appearing: Troubleshooting
- Settings or Cookie Categories Not Saving or Loading
- Embeds Blocked After Consent (YouTube, Maps, Vimeo)
- Site Performance / Page Speed
- Scanning Your Site From Your Browser
- Importing and Exporting SureCookie Settings
- Verifying Your Domain With a DNS Record
Handling Data Requests
Privacy laws give people the right to ask what personal data you hold about them, and to ask you to correct or delete it. Under GDPR you generally have one month to answer. Data Requests gives you a place for those requests to arrive, a record of what you did about each one, and a deadline attached to every request so none of them quietly expires.
Data Requests is a SureCookie Pro feature. On the free plugin the screen explains how the workflow works, but requests cannot be received or handled.
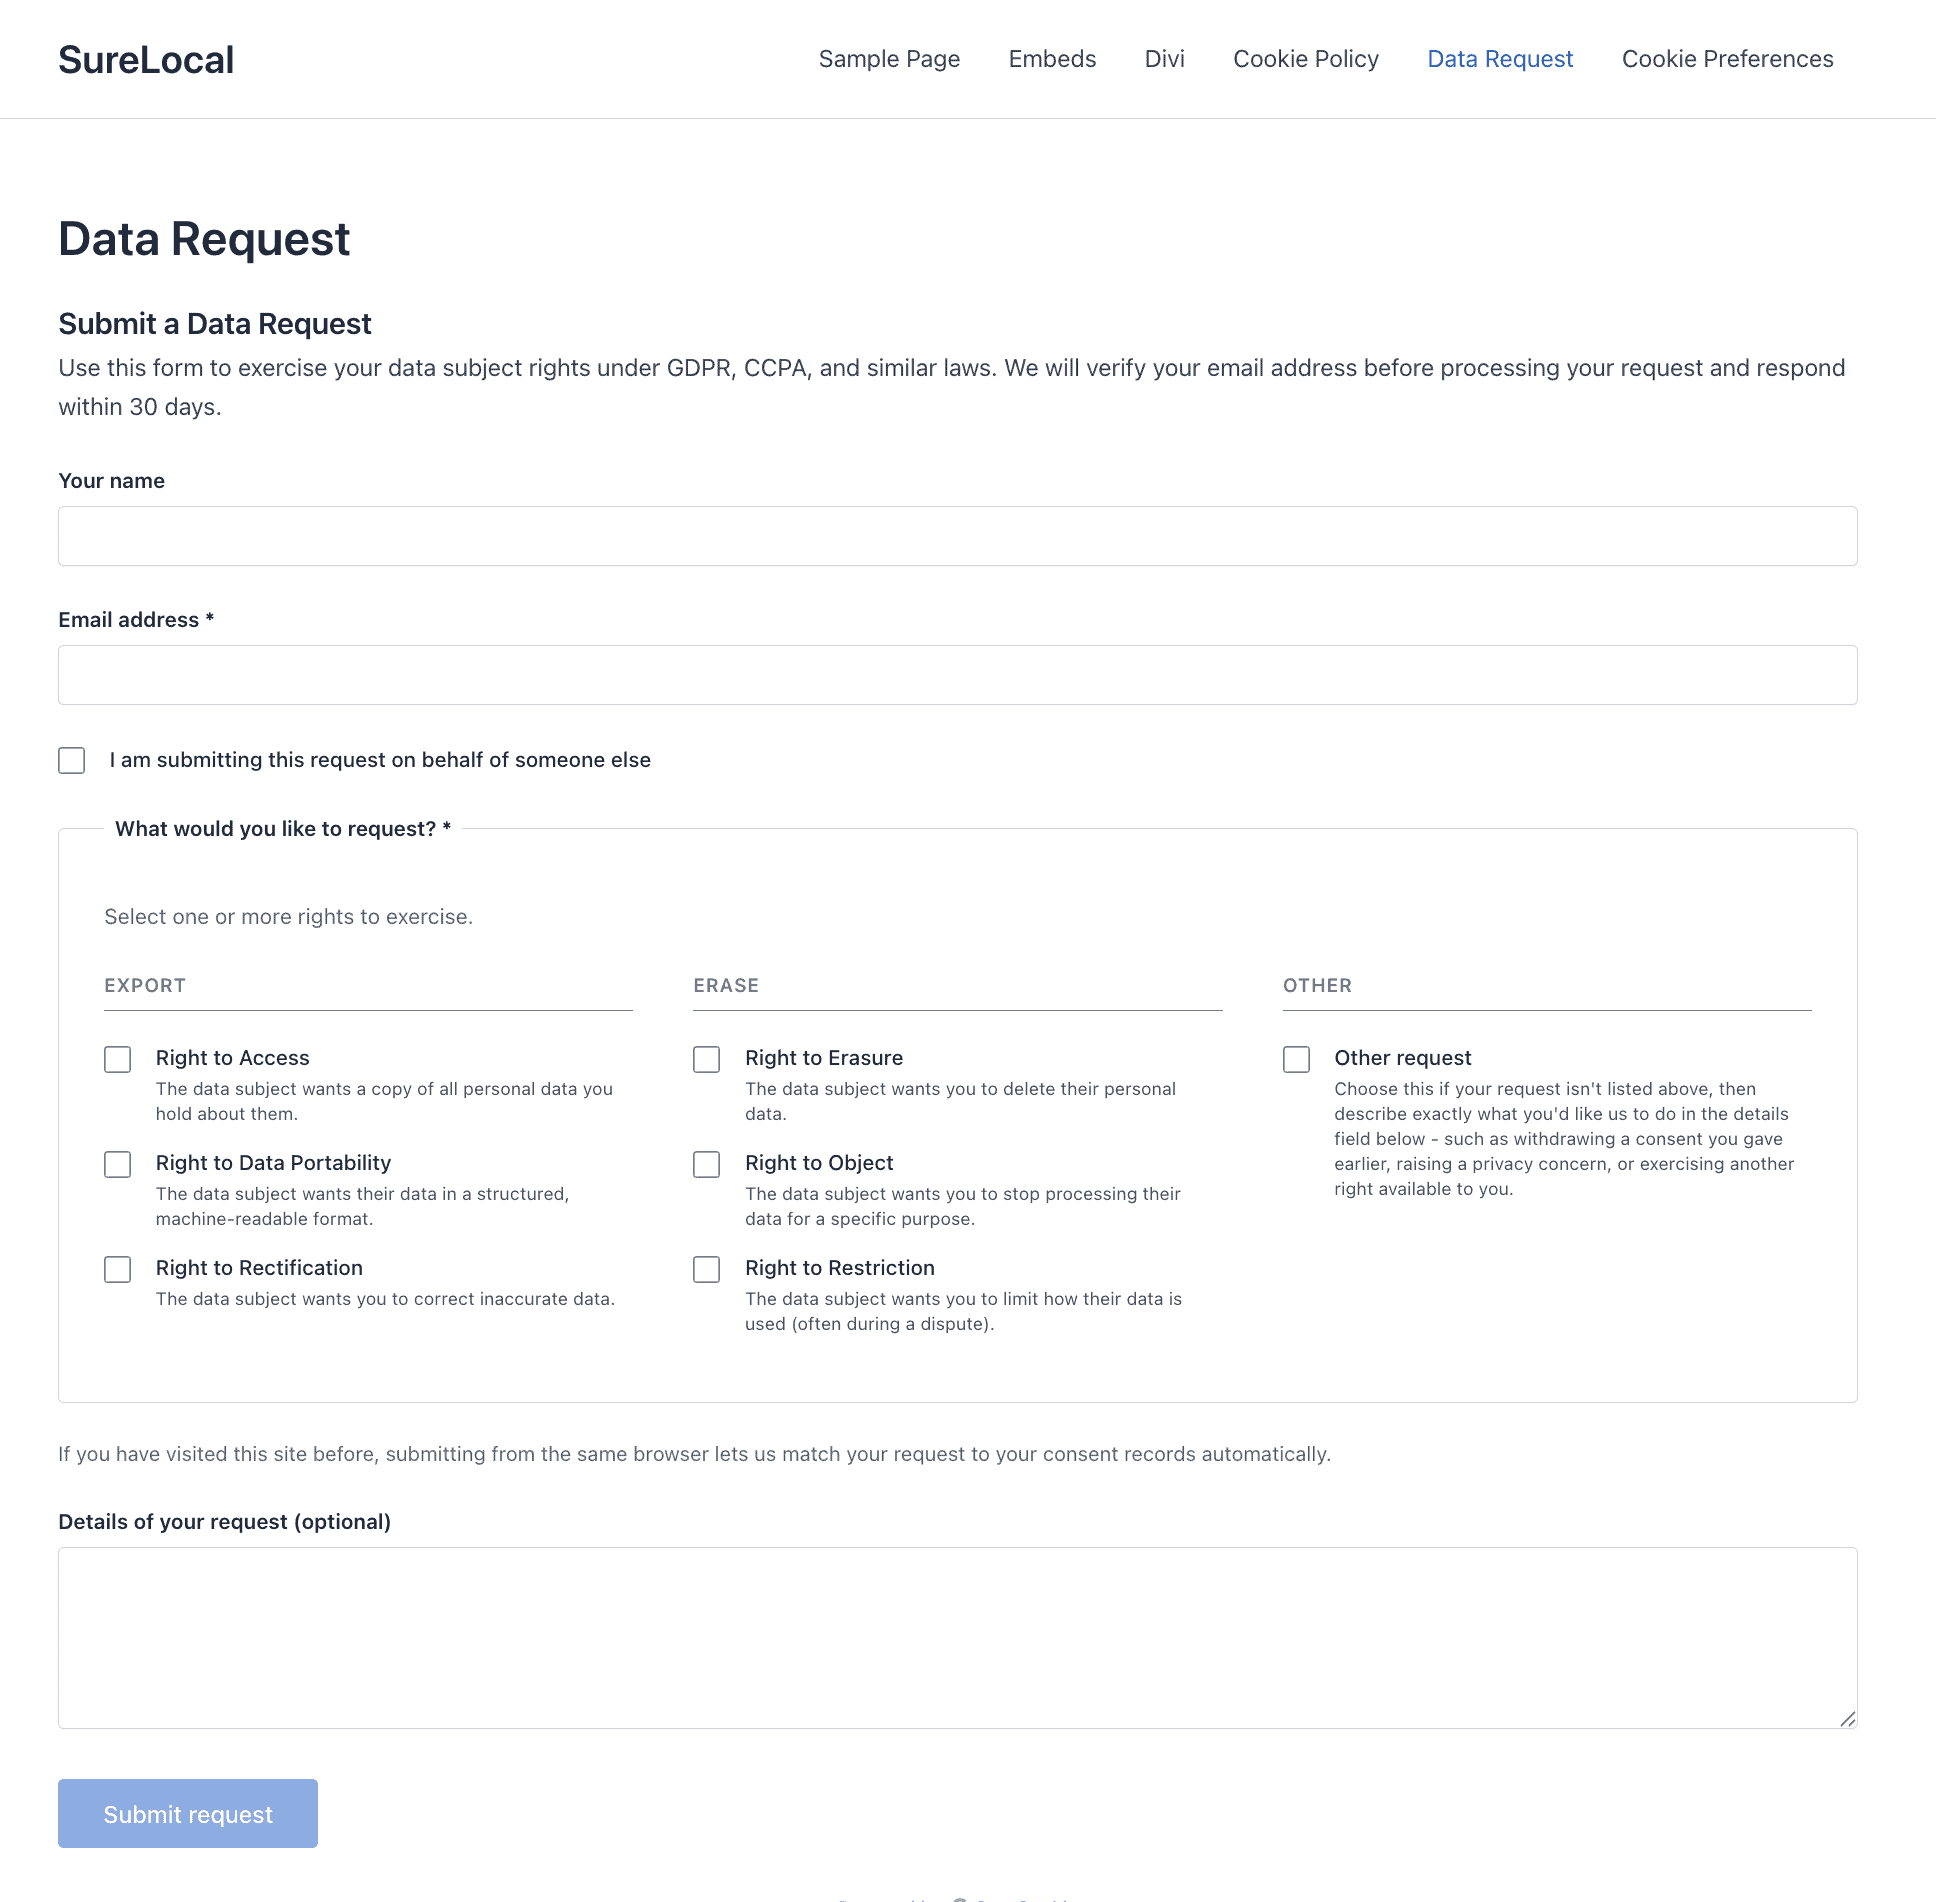
Visitors submit requests through a form you publish on your site. Every request is confirmed by email before it reaches you, so nobody can file a request in someone else’s name.
Step 1: Turn On Data Requests
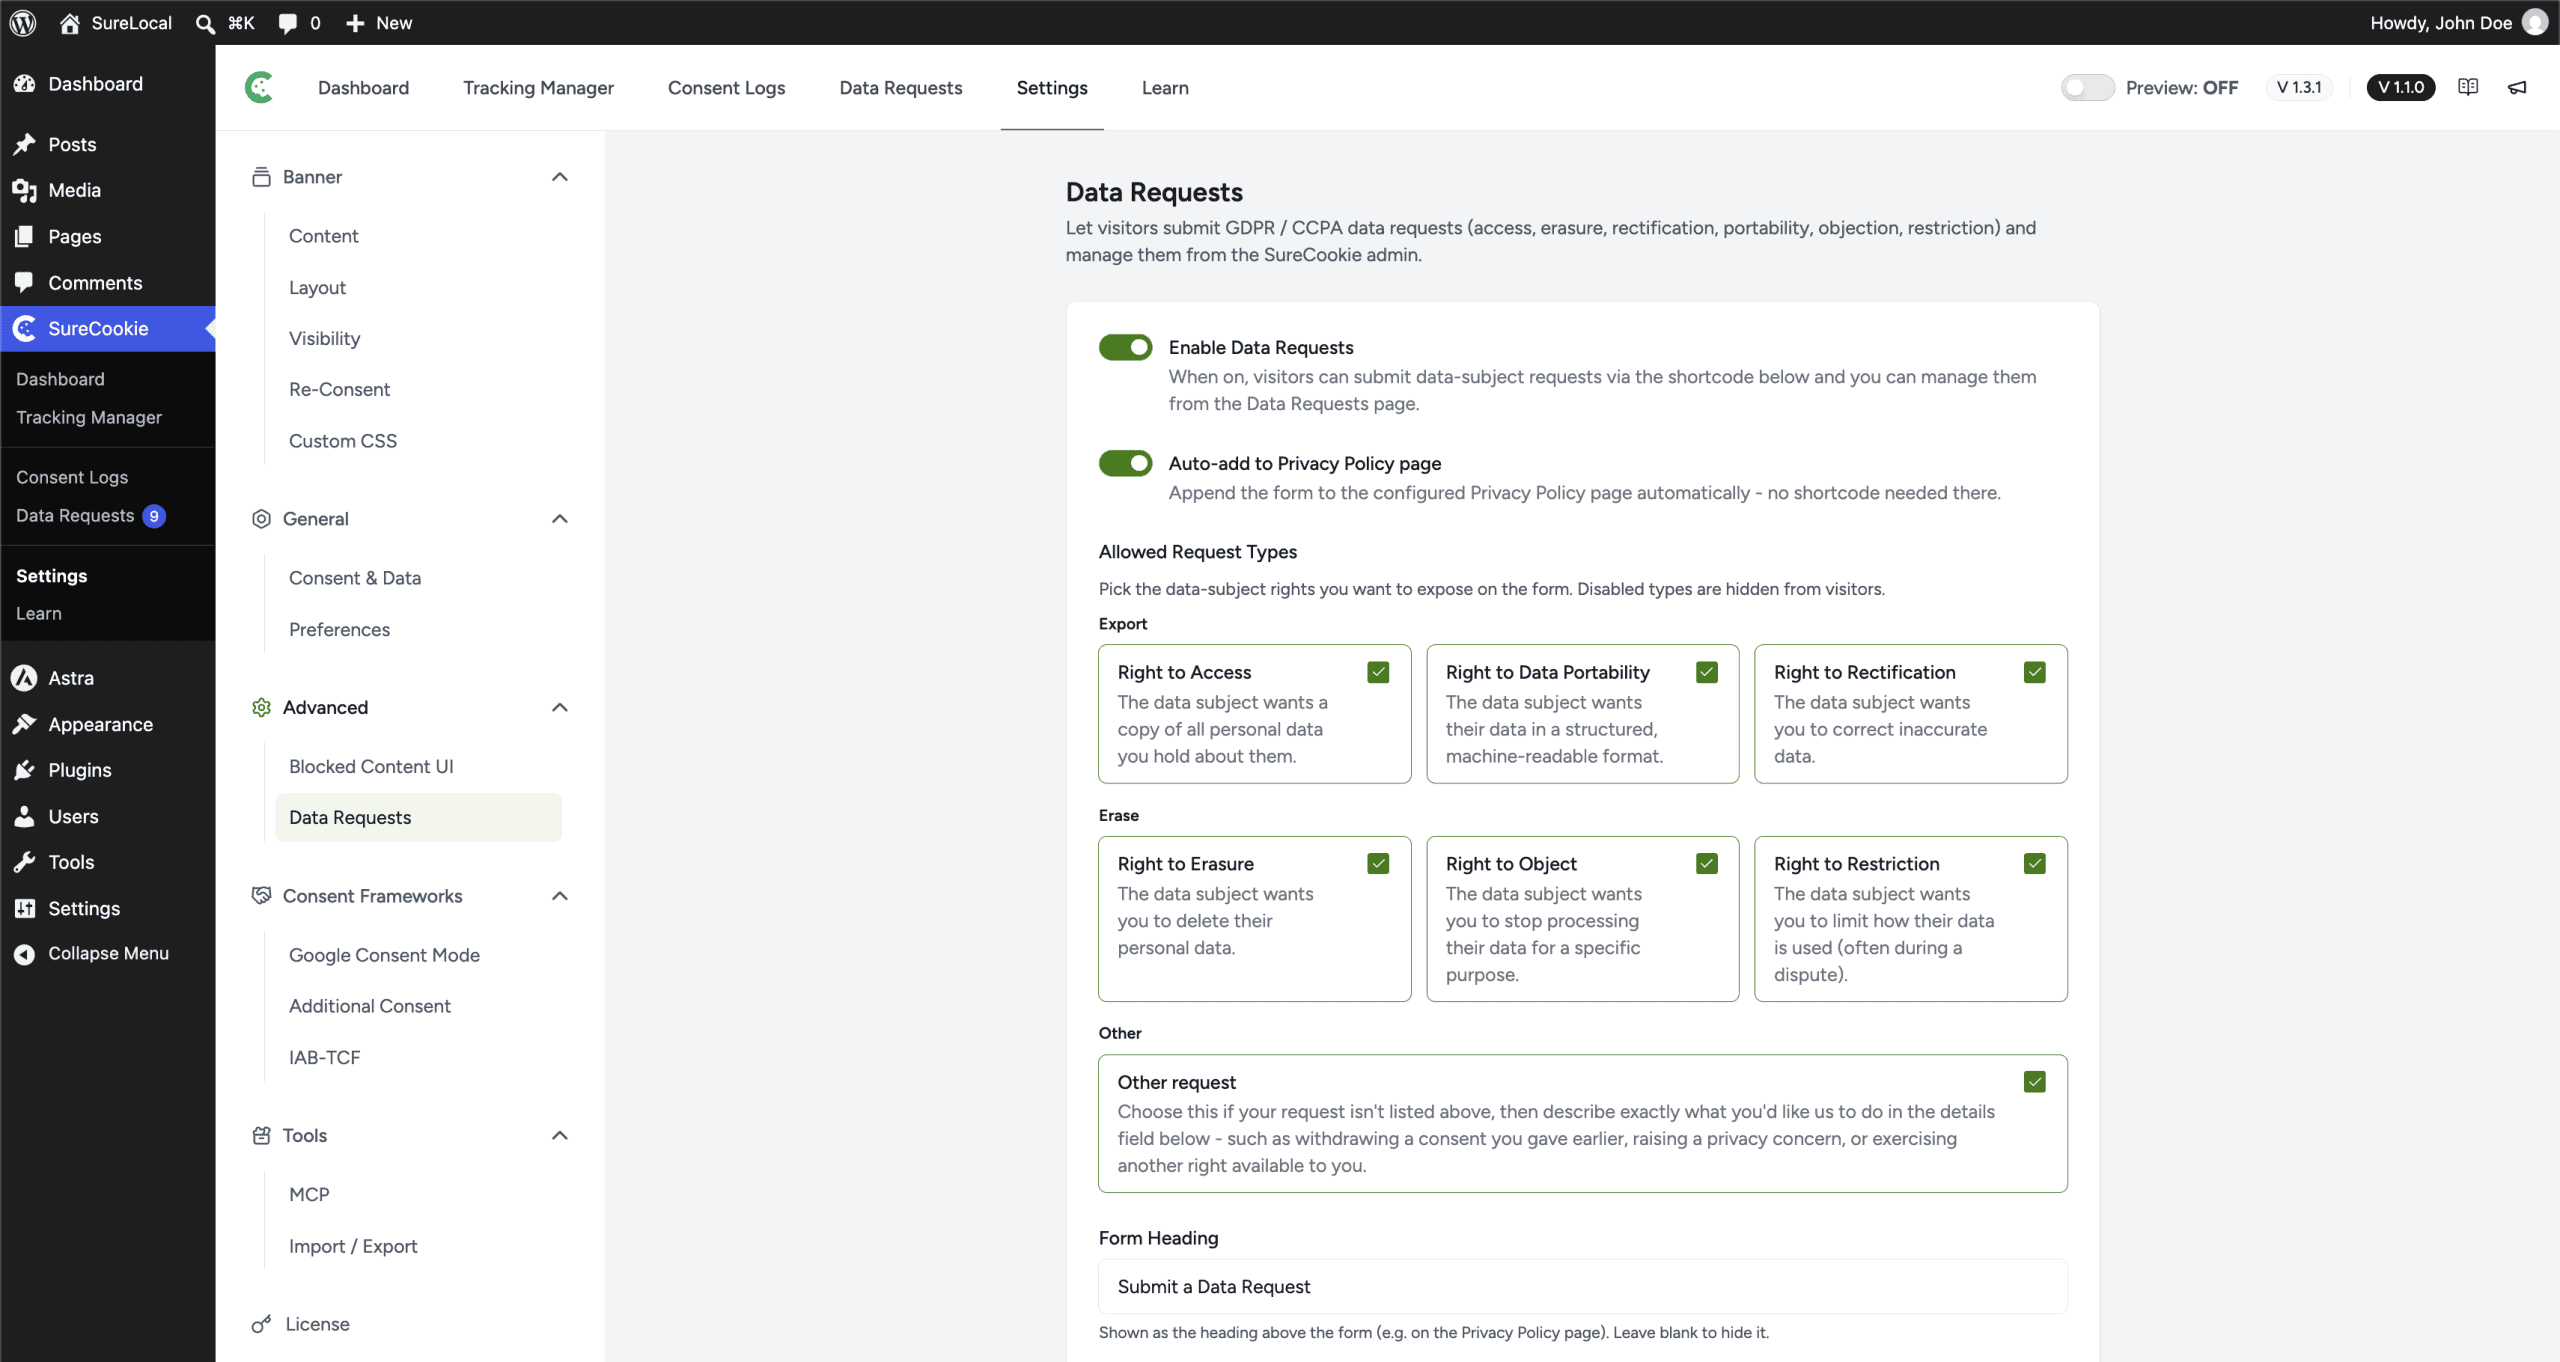
- Go to SureCookie > Data Requests.
- In the Data Request Settings card, click Configure. It opens SureCookie > Settings > Advanced > Data Requests, where every setting in this step lives.
- Turn on Enable Data Requests.
- Enter the address that should hear about new requests under Notify Admin at.
- Set Response Deadline (days). The default is 30, which suits the GDPR one-month deadline.
- Click Save.
Tip: Use a monitored shared mailbox for Notify Admin at, not a personal address. A statutory deadline should not depend on one person reading their email.
Step 2: Choose Which Rights to Offer
Allowed Request Types decides what visitors can ask for. Types you disable are hidden from the form.
| Group | Types | What the visitor wants |
|---|---|---|
| Export | Access, Portability, Rectification | A copy of their data, or a correction to it |
| Erase | Erasure, Objection, Restriction | Their data deleted, or your use of it stopped |
| Other | Other | Anything that does not fit the above |
- Under Allowed Request Types, select the rights you want to offer.
- Click Save.
Important: Which rights you must offer depends on the laws that apply to you, not on which are convenient. Confirm the list with whoever advises you on compliance before narrowing it.
Step 3: Publish the Form
You can let SureCookie place the form for you, or position it yourself.
To place it automatically, turn on Auto-add to Privacy Policy page. SureCookie appends the form to the Privacy Policy page configured in WordPress, and no shortcode is needed there.
To place it yourself, copy the shortcode under Form shortcode using Copy shortcode, then paste it into any page:
[surecookie_data_request]You can also change how the form reads:
- Form Heading – The heading above the form. Defaults to Submit a Data Request. Leave it blank to hide the heading.
- Form Description – Text shown above the form, for anything visitors should know before submitting.
Note: If you turn on auto-insert and also place the shortcode on the Privacy Policy page, the form still appears once. SureCookie will not render it twice on the same page.
Step 4: Work Through the Queue
Requests arrive on SureCookie → Data Requests, listed with their ID, Requester, Type, Status, Submitted date, and Deadline.
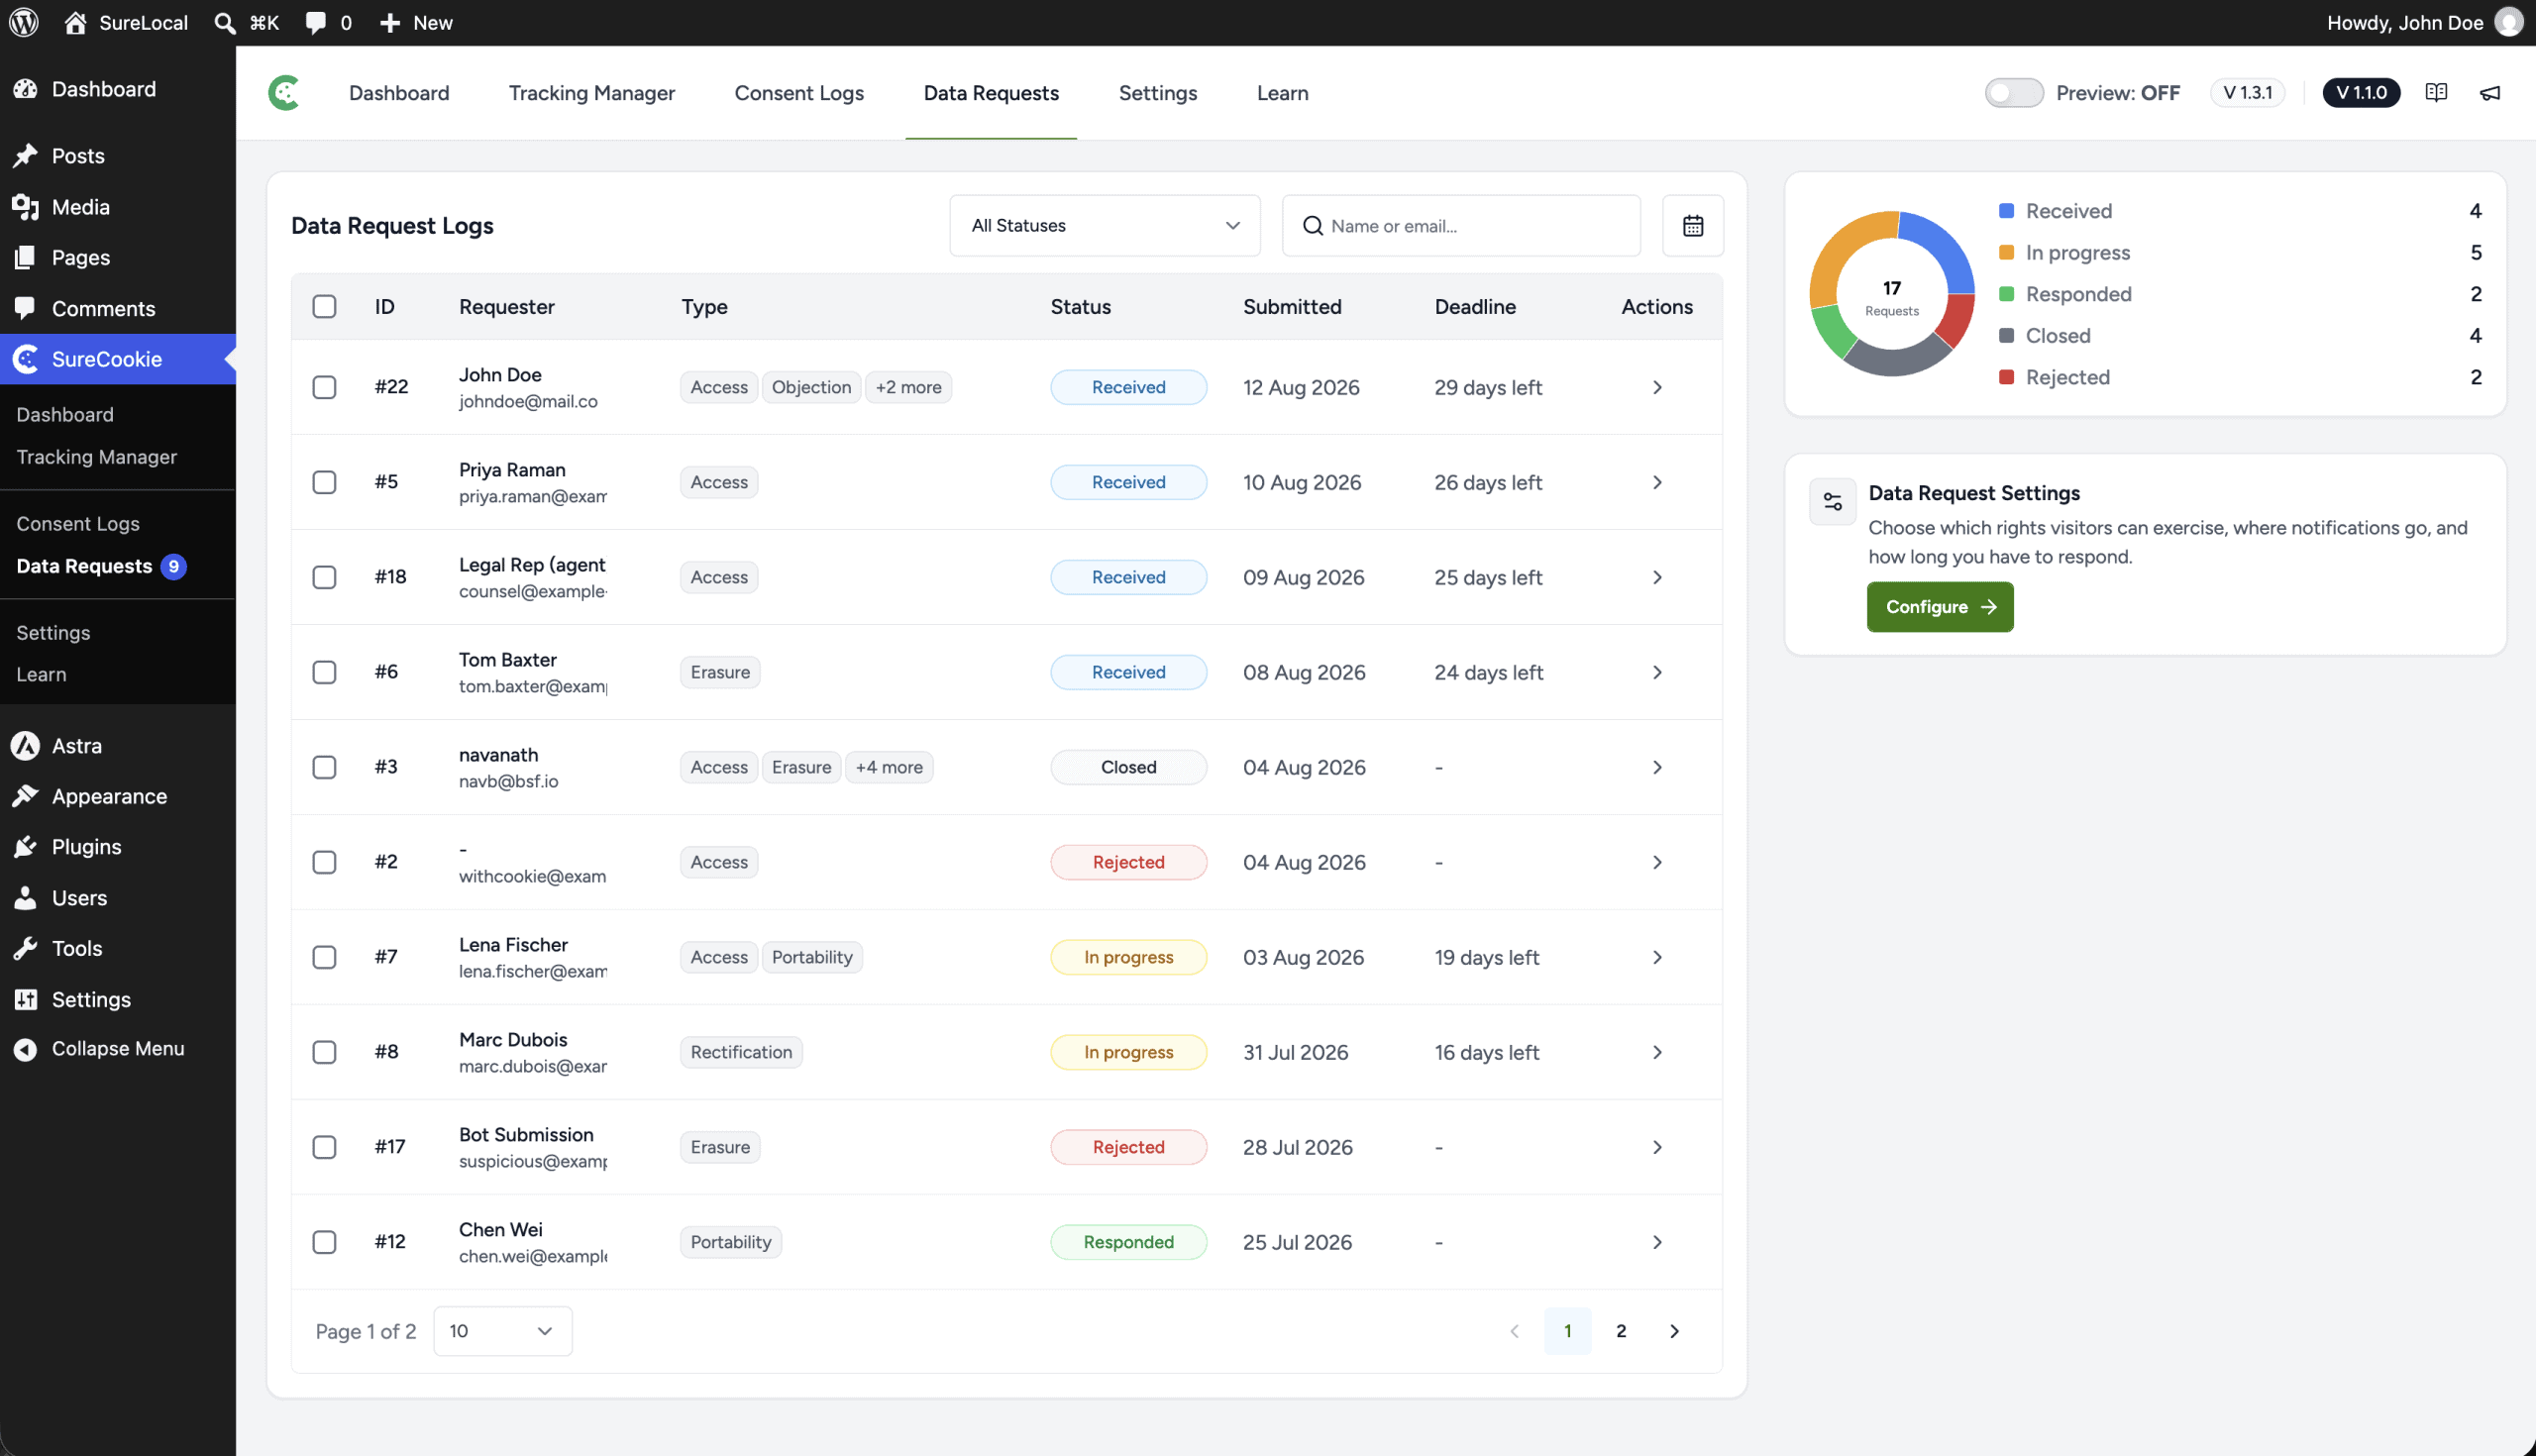
A request moves through these states:
- Pending verification – Submitted, but the requester has not clicked the confirmation link yet. It is not yet your responsibility.
- Received – Confirmed and waiting for you. The deadline is now running.
- In progress – You have started work. The requester is told their request is being handled.
- Responded – You have replied.
- Closed – Finished and filed.
- Rejected – Declined, with a reason recorded.
Click a row to open the request. The panel shows the Name, Email, Type, Submitted date, Source page, and, where SureCookie can match it, the SureCookie session ID that links the request to that person’s consent history.
Note: Unverified requests are deleted automatically after 7 days. Somebody who submits a request and never confirms it leaves nothing behind on your server.
Step 5: Reply to a Request
- Open the request and choose Reply.
- Write your Message.
- For an access or portability request, click Export data to generate the file, then Preview to check it before it goes anywhere.
- Click Send response.
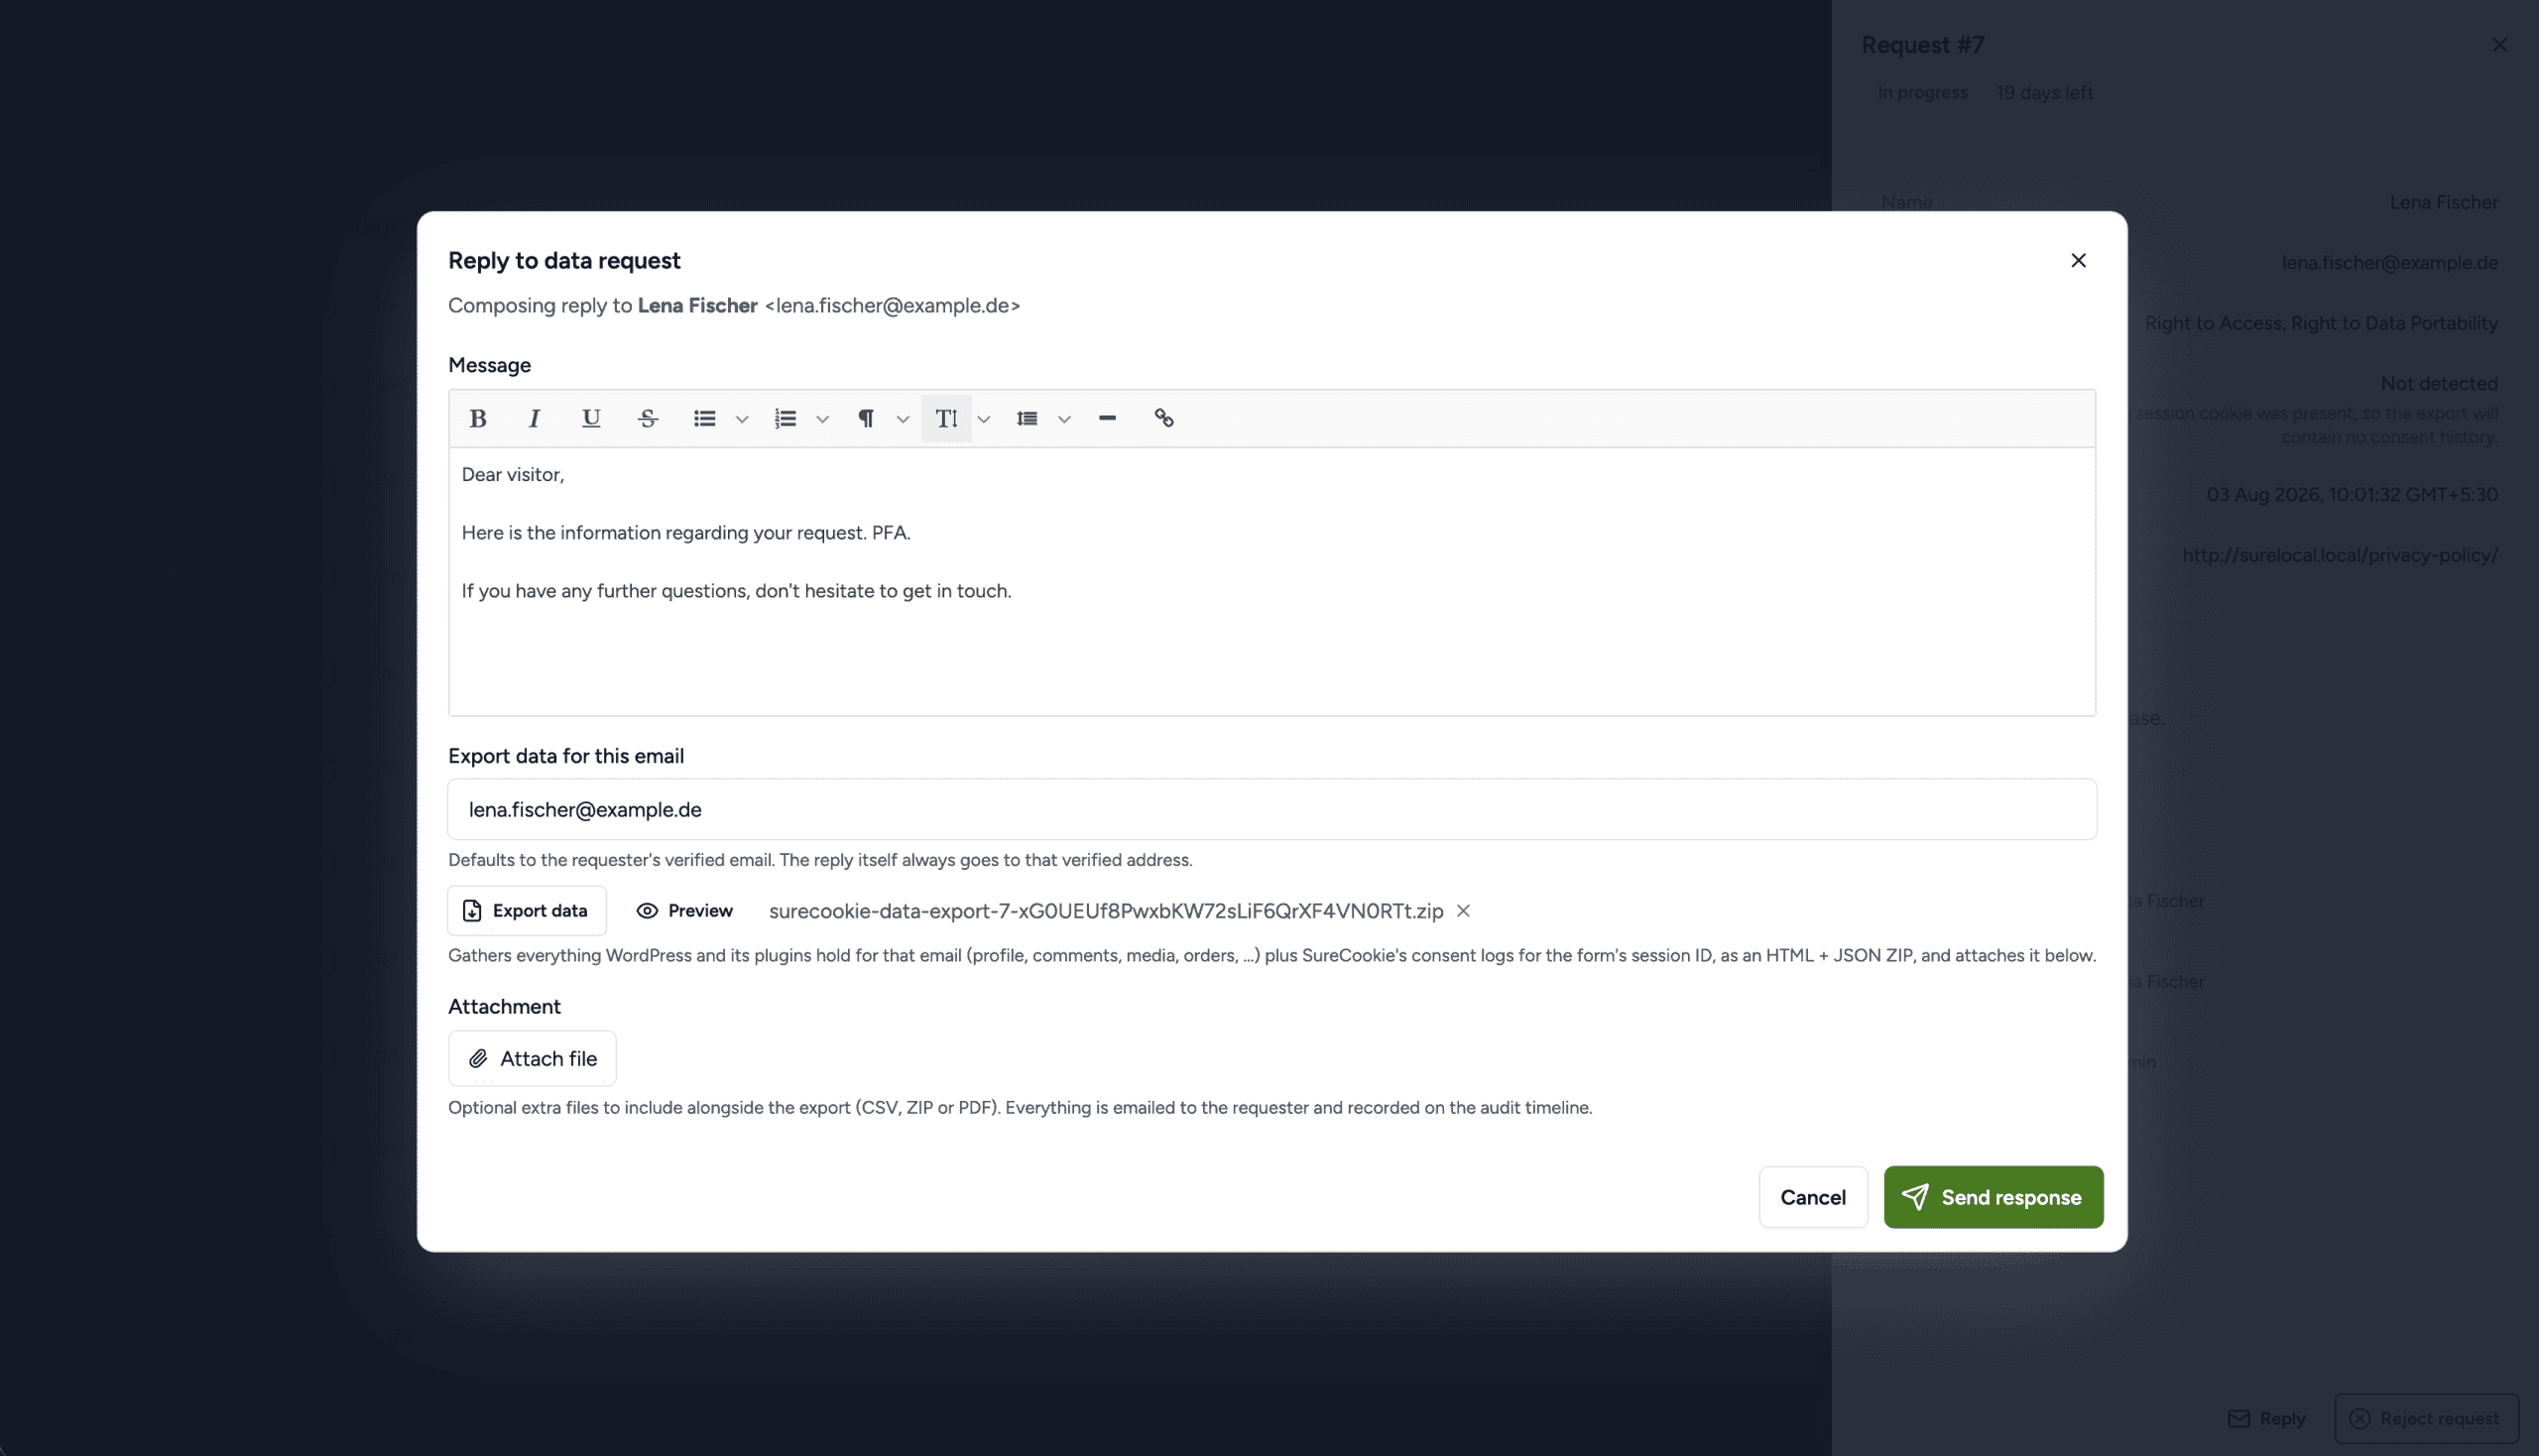
You can also Mark closed when no reply is needed, Reject request with a Reason, or Archive request once it is finished with.
Important: The export is gathered from every personal data exporter registered on your site, so it can include data held by WordPress core and your other plugins alongside SureCookie’s own consent and request records. Always use Preview and read the file before sending it. You are emailing personal data to an address that came from a public form.
Exports are deleted automatically once your retention period passes, which is 3 days by default, so dossiers do not accumulate on your server.
Requests Made Through WordPress
SureCookie also registers with WordPress’s own privacy tools. A request you handle from Tools → Export Personal Data or Tools → Erase Personal Data includes the data SureCookie stores, so you get a complete answer whichever route you use.
Keeping to the Deadline
Every confirmed request carries its own deadline, calculated from Response Deadline (days). Once a day SureCookie emails a summary of what is overdue and what is due soon to your Notify Admin at address.
Tip: If the daily summary never arrives, the rest of the queue is still fine, but you have lost your safety net. See Troubleshooting below.
Troubleshooting
- The form does not appear on the page. Confirm Enable Data Requests is on. The shortcode renders nothing while the feature is off.
- Auto-insert is on, the Privacy Policy page is set, and the form still does not appear. Auto-insert appends the form through WordPress’s content filter. A page builder that renders your Privacy Policy page from its own template can build the page outside that filter, and the form is never added. Place it yourself instead: paste the shortcode from Form shortcode into a text or shortcode module on the page.
- Requesters never receive the confirmation email. Your site cannot send email reliably. Install an SMTP plugin and send a test, then ask the requester to submit again.
- The form and its emails are in English on a non-English site. These labels, buttons and messages are SureCookie Pro’s own text and follow your site language. Before SureCookie Pro 1.3.0 they never loaded their translations and stayed in English whatever your site language was, so update Pro first. Translating SureCookie’s free language files does not reach them either: the free plugin and Pro ship separate translations, and the form belongs to Pro.
- The heading and intro above the form are in the wrong language. Form Heading and Form Description are your own wording, not translated strings, so no language file changes them. Edit them under SureCookie > Settings > Advanced > Data Requests.
- No daily summary arrives. Check your version first. Before SureCookie Pro 1.3.0 the daily job was never scheduled on any site, so the summary was never sent, unverified requests were never cleared, and old export files never expired. Update Pro and load any page on your site once, which schedules the job. If you are already on 1.3.0 or later, the summary runs on WP-Cron, and a host that has disabled WP-Cron or a site with very little traffic can stop scheduled tasks firing. Check your queue by hand until cron is working.
- A request shows no session ID. SureCookie could not match the requester to a consent record, usually because they consented on another device or cleared their cookies. Handle the request as normal.
- The export is empty or smaller than expected. Nothing registered on your site returned data for that email address. Confirm the address matches the one they use on your site.
- The form states a response time that is not your deadline. The line under the intro is generated from Response Deadline (days), so it always matches the deadline requests are tracked against. A different figure above it is wording saved in Form Description. Edit it under SureCookie > Settings > Advanced > Data Requests.
Next Steps
Submit a test request through your own form and take it all the way to a reply. It is the quickest way to confirm your emails send, your deadline is right, and the export contains what you expect.
We don't respond to the article feedback, we use it to improve our support content.